In Unity:
1. Create a panel to hold the Scrolling content. Give this a name “AbilitiesPanel”.

2. Add a Game Object as a child. This is the actual Scroll Container. Add the Scroll Rect Component.
3. Add an Image Component, and a Mask Component. These two are used so the scrollable content is “cut off” by the boundaries of the scroll container.

4. Create the scrolling content Panel, as a child of the Scroll Rect GameObject. Give this the Vertical Layout Group Component. Give the scrolling content a name and a tag (AbilityContentPanel) so you can quickly get a reference in script.

5. Drag the Scrolling Content to the content field in the parent Scroll Rect Component.

6. Create the UI content of each item inside the scrollable menu. In this case, we have a parent Panel, with a child Button and Text UI elements, in a horizontal layout.
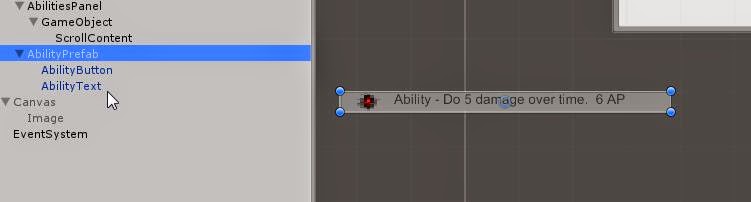
7. Add a Prefab to the Assets, in the Resources folder. This prefab will need to be loaded at runtime, so it needs to be in Resources. Give it a name (AbilityPrefab). Drag your menu item to the prefab. Once it turns blue, it’s synced with the prefab. The original UI elements can now be deleted from the Hierarchy.

In Script:
Transform AbilityPanel = GameObject.FindGameObjectWithTag("AbilityContentPanel").transform;
2. Initialize the Prefab. Hold onto the created Game Object.
   var AbilityItemPrefab = Resources.Load<GameObject>("AbilityPrefab");
foreach (var ab in usableAbilityList)
 {
            GameObject abilityItem = (GameObject)Instantiate(AbilityItemPrefab);
updateAbilityButton(abilityItem, assetLibrary.getSprite(SpritesheetType.Particles, 0), ab);
            abilityItem = updateAbilityItem(abilityItem, ab);
            abilityItem.transform.SetParent(AbilityPanel, true);
        }
3. Update the GameObject components with the custom content from your list.private void updateAbilityButton(GameObject parent, Sprite sprite, Ability selectedAbility)
{
Image buttonImage = parent.GetComponentInChildren<Image>();
buttonImage.overrideSprite = sprite;
Button buttonClick = parent.GetComponentInChildren<Button>();
buttonClick.onClick.AddListener(() => PlayerAbilityStart(selectedAbility));
}
private GameObject updateAbilityItem(GameObject abilityItem, Ability a)
{
string abilityText = string.Format("{0} - {1}. AP: {2} Uses: {3}",a.name,a.description,a.ap,a.uses);
//set click on icon
UpdateTextComponent(abilityItem, "AbilityText", abilityText);
return abilityItem;
}
4. Change the transform parent of the Initiated Prefab GameObject to the Scroll Content container.
abilityItem.transform.SetParent(AbilityPanel, true);That’s pretty much it. You’ll have to have methods that are called when you click on the button. And remember if you want to update your Menu, you’ll need to remove all the Initialized Game Objects from the prefab first.
Here’s a helper method:
private void DestroyAllChildren(Transform parent)
{
        for (int i = parent.childCount - 1; i >= 0; i--)
        {
            Destroy(parent.GetChild(i).gameObject);
        }
}
No comments:
Post a Comment